Rough automatic draft, low quality: expect mistakes and awkward wording. It will be replaced by a better translation. Original →
47
THE UNTOUCHABLE KING
Previously, we looked at a wide variety of mathematical problems on the chessboard. Now we will focus on problems that can also be classified as mathematical, but their chess content is richer than before. In other words, we will be interested in elements of mathematics that occur unrepresented in the chess game itself.
First, let us recall the feature of “chessboard gamemetry” associated with distances. The fields e1 and a5 on figure 1 are at a “diagonal” distance. The king with e1 can reach square a5 in 4 moves. It turns out that the diagonal path is the shortest possible; it cannot be replaced by any other matriroot.
Now consider two fields located on the same straight line:
fields e1 and e8 on vertical e. Moving along it, king e1 can reach square e8 in 7 moves. It is clear that the king’s maturation could have been different. There are exactly 393 (!) ways to reach square e8 in the same 7 moves. The king can move to the e8 square with the most bizarre zig-zag matrirs, as long as they are within the framework of the next figure 1 piece and as long as the king moves from one rank to the next on each move. For proof
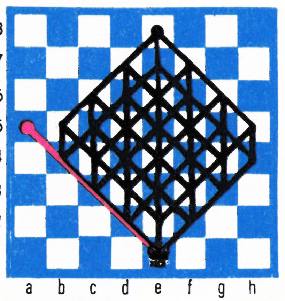
Fig. 1.
you can count the number of matriroutes containing 0, 2, 4 or 6 diagonal moves. Using some information from combinatorics (see “Quant” No. 1, 1971), it is easy to find it:
So, the movement of the king in a straight line, if necessary, can be replaced by movement along a broken line. Here is a practical illustration of this important consideration.
On figure 2 the a7 pawn is defenseless, and Black’s only chance is to respond to the inevitable K:a7 with Krs7 with a draw, since the white king will not be able to get out of captivity. The white king’s path to the pawn will take 5 moves. However, there is only one winning matrice: 1. Npf7-e6! Npb2—c3 2. Kreb—d5!!, and not-
48
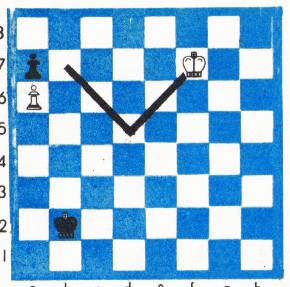
Fig. 2. I. Maizelis, 1921 White start and win.
the possibility of 2… Kd4 is disastrous for Black. (Does not work, for example, 1. Kb Krs3 2. Kd6 Kd4 3. Ks6 Krs5! 4. Kpb7 Kd6 5. Kd: a7 Ks7).
Of course, in practice there are more subtle cases.
Mathematicians have long despaired of creating the structure of a mathematical theory of the game of chess and are limiting themselves only to particular questions. However, the study of many chess positions is completely mathematical in nature. Let’s give a few examples, all of them relate to the theory of pawn endings.
In position on figure 3 the white king does not take part in the game.
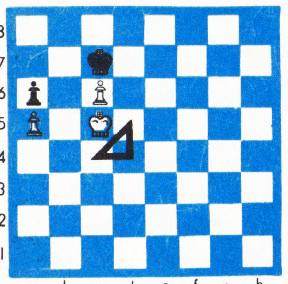
Fig. 3.
re, and it all depends on whether the black king manages to catch up with the h3 pawn. Inexperienced chess players usually reason like this: a pawn goes here, a king there, a pawn here, a king there… that is, what is called “on the fingers.” At the same time, they usually get confused (especially when there are still some pawns on the board) and miscalculate. It turns out that the outcome of the game is very easy to evaluate using the “square rule”: it is enough to find out whether the king, during his move, can enter the pawn’s “square”, in this case depicted at figure 3: c3—c8—h8—h3. More
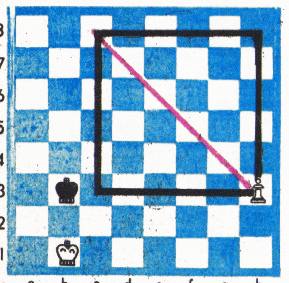
Fig. 4.
It’s easier to mentally draw just one line - the diagonal of the square (h3-c8). It follows from this that in the position on figure 3 Black makes a draw on his move (goes into the square), and loses on his opponent’s move.
Let us now consider the position on figure 4. Black immediately loses on his move, since the white king moves to b6 and eats the a6 pawn. Thus, White needs to pass the turn of the move to the opponent. How to do this? After 1. Kd5 Ks8 nothing gives 2. Kd6 (2… Kd8 3. c7 + Ks8 4. Ks6 stalemate!), and 2. Ks5 Ks7 leads to the original position. Gaining tempo is achieved using the so-called “triangle method”. For this case, this triangle (c4-d4-d5) is depicted on the same figure 4.
After 1. Krs5—d5 Krs7—c8 2. Kd5—d4 Ks8—b8 3. Kd4—c4! Kb8-c8 4. Kc4-d5 White achieves his goals, since on 4… Kc8-d8 5. Kd5-d6 now wins, and on 4… Kc8-c7-5. Kd5-c5.
Let us now turn to the position at figure 5a. Although White has two extra pawns here, it is extremely difficult to win. To analyze positions with a blocked pawn structure, various methods are used: “Bianchetti critical distances”, “Ebers coordinate system” and others. The general theory of blocked pawn endings is called the theory of corresponding fields. The study of each specific position can be considered as a solution to a subtle mathematical problem, but a general mathematical theory has not yet been created. Of course, we are not able to remain
49
update in our notes on all the details of the theory of the corresponding fields*), we will limit ourselves to only studying the position of Figure 5a, displacing the results of the analysis to figure 56.
White intends to check either through the square d6 or through f4, the black king must have time to prevent both of these plans. Thus, if the white king gets to c5, then black must meet it on the e7 square (with the queen on d7, black does not have time to defend the g4 pawn: Kpc5-d4-e3-f4). In other words, field c5 corresponds to field e7. If the white king is on f4, black must be in time on h5, that is, the f4 square corresponds to the h5 square.
The d4 square is very important for White. It is easy to see that in this case the king
*) You can read more about this, for example, in the book “Chess Endings”, vol. 1, edited by Yu. Averbakh, M., 1956.
must stand on f7 in order to respond to Kpd4-c5 with Kpf7-e7, and to have a response to Kpd4-e3 with Kpf7-g6. From square c4 White can play either Kpc5 or Kpd4. The black king in this case should be located on f8, from where both Kpe7 (with Kpc4-c5) and Kpf7 (with Kpc4-d4) are possible. From square d3 the possible moves are Kpc4, Kpd4, Kpe3. Therefore, field d3 corresponds to field g7. From square c3 the possible moves are Kpd4, Kpc4, Kpd3. In this case, the only square from where the black king can get to f7, f8, g7 is the g8 square.
By traversing sequentially all the most important squares at the disposal of the white king and the moving matching square for his black counterpart, we obtain figure 56. The corresponding squares here are designated by the same number. Note that the found correspondence is not unique, as can be seen in the figure. For example, squares b4 and d4 for the white king correspond to the same square f7 for black.
Now the finding solution is almost automatic. In this case, you should be guided by only one rule: place the white king on a square that corresponds to the current location of the black king, or on a square that corresponds to which the black king cannot get to in one move. Since the field b1 corresponds to the field g7, the field b2—h7, and the field a2—h8, then only 1. Kpa1—a2!! is solved. Aftermath Kpb1? Kpg7! or 1. Kpb2? Kph7! blacks in random will be added to draws.
Since the further course of the game is simple, we will present only the main option (if Black plays differently, then, as you can easily establish for yourself, he loses even faster):
- Kpa1—a2!! Kph8—h7
- Kpa2—b2! Kph7—g7
- Kpb2—b3! Kpg7—g8
- Kpb3—c3! Kpg8—f8
- Kpc3—c4! Kpf8—f7
- Kpc4—d4! In the opposite direction, shown in Figure 5a, the white king has made the “way up” and black is defenseless.
Obviously, with the help of Figure 56 it is easy to estimate the position for other initial positions of the queens, but only for this stove configuration.